
Categories are one of WordPress’s most powerful organizational tools, helping you structure your content logically and improve your site’s navigation.
Whether you’re running a blog, business website, or online magazine, knowing how to add a category in WordPress is essential for better organization and user experience.
In this comprehensive guide, we’ll walk you through everything you need to know about adding and managing categories in WordPress.
What are WordPress Categories?
WordPress categories are a way to group related posts together. They create a hierarchical structure for your content, similar to folders on your computer. Categories are one of WordPress’s built-in taxonomies and are essential for organizing your blog posts and improving user experience.
Why Are Categories Important?
Before diving into the how-to, let’s understand why categories matter:
- Better Organization: Keep your content structured and easy to navigate
- Improved SEO: Help search engines understand your content structure
- Enhanced User Experience: Allow visitors to find related content quickly
- Content Discovery: Make it easier for readers to explore topics they’re interested in
- Site Architecture: Create logical pathways through your website
Prerequisites
To follow this guide, you’ll need:
- A WordPress website (self-hosted or WordPress.com)
- Admin access to your WordPress dashboard
- Basic familiarity with the WordPress admin area
How to Add a Category in WordPress: Three Essential Methods
Method 1: Adding Categories from the WordPress Dashboard
Step 1: Access the Categories Section

- Log into your WordPress dashboard
- Navigate to Posts > Categories in the left sidebar
- You’ll see the Categories management page with existing categories listed on the right
Step 2: Add a New Category
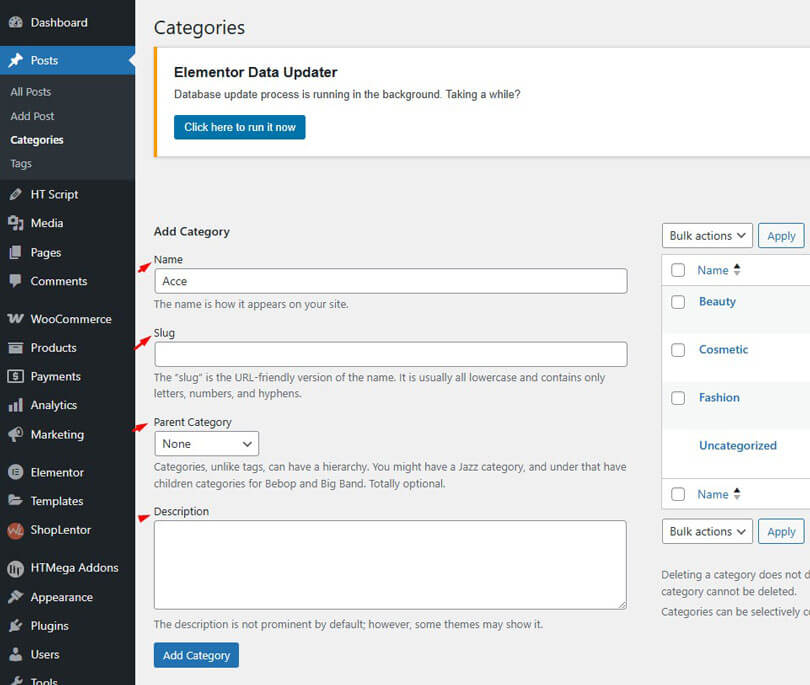
- On the left side of the Categories page, you’ll find the “Add New Category” form
- Fill in the required information:
- Name: Enter the category name (e.g., “Web Design”, “Travel Tips”)
- Slug: WordPress auto-generates this, but you can customize it for SEO
- Parent Category: Choose if this is a subcategory of another category
- Description: Add an optional description (some themes display this)
Step 3: Save Your Category
- Click the “Add New Category” button
- Your new category will appear in the categories list on the right
- The category is now available for use in your posts
Method 2: Adding Categories While Writing a Post

Quick Category Addition
- Go to Posts > Add New or edit an existing post.
- In the post editor, look for the “Categories” panel on the right sidebar.
- To add a new category:
- Click “+ Add New Category” at the bottom of the categories list.
- Enter the category name.
- Press Enter or click “Add New Category”.
- The new category will be created and automatically assigned to your current post.
Using the Block Editor (Gutenberg)
- While editing a post in the block editor
- Open the Document tab in the right sidebar
- Scroll down to the Categories section
- Click “+ Add New Category”
- Enter the category name and press Enter
Method 3: Adding Categories via Quick Edit

- Go to Posts > All Posts
- Hover over a post title and click “Quick Edit”.
- In the Categories section, you can:
- Check existing categories to assign them.
- Click “Update” to save changes.
Creating Category Hierarchies (Parent and Child Categories)
WordPress allows you to create nested categories for better organization. Understanding how to add a category in WordPress with proper hierarchy helps create a more structured and user-friendly website navigation system.
Creating Parent Categories
- Go to Posts > Categories.
- Add your main category without selecting a parent.
- Examples: “Technology”, “Lifestyle”, “Business”.
Creating Child Categories
- Create a new category.
- In the Parent Category dropdown, select the parent category.
- Examples: Under “Technology” you might have “Web Development”, “Mobile Apps”, “AI”.
Benefits of Category Hierarchies
- Better content organization
- Improved site navigation
- Enhanced SEO structure
- Clearer content relationships
Recommended Blogs for You:
👉 How to Add Sticky Content in Elementor: Header, Footer, Section
👉 How to Fix WordPress Error Establishing Database Connection in 2025
👉 Is WordPress Good for Small Business? The Complete Guide
👉 Top 6 WooCommerce Category Widgets: Enhance Your Online Store Navigation
Managing and Editing Categories
Editing Existing Categories
- Go to Posts > Categories
- Hover over a category name and click “Edit”
- Modify the name, slug, parent, or description
- Click “Update” to save changes
Deleting Categories
- Go to Posts > Categories
- Hover over a category and click “Delete”
- Posts in deleted categories will be moved to “Uncategorized”
Bulk Actions
- Select multiple categories using checkboxes
- Choose “Delete” from the Bulk Actions dropdown
- Click “Apply”
Best Practices for WordPress Categories
1. Keep Categories Broad and Strategic
Use categories for main topics rather than specific details. Aim for 5-10 primary categories that represent your core content pillars. Think of categories as the main sections of your website that help visitors understand your overall content structure.
2. Plan Your Category Hierarchy Carefully
Before creating categories, map out your site’s content structure. Use parent-child relationships strategically to create logical groupings, but avoid going more than 2-3 levels deep to prevent navigation confusion.
3. Choose Clear, User-Friendly Names
Select category names that are intuitive to your target audience. Avoid technical jargon or overly creative names that might confuse visitors. Keep names concise but descriptive enough to clearly indicate what content they contain.
4. Optimize for SEO Performance
Create SEO-friendly category slugs using relevant keywords. Write compelling category descriptions that help both users and search engines understand the content. Use categories strategically to build your site’s topical authority and internal linking structure.
5. Maintain Consistent Organization
Regularly audit your categories to remove unused ones and merge similar topics. Ensure each post fits logically into its assigned categories and avoid over-categorizing individual posts (limit to 2-3 categories per post).
6. Design for User Experience
Consider how categories will appear in your navigation menus, sidebar widgets, and archive pages. Use tools like HT Mega’s Category List Widget to create visually appealing category displays that encourage exploration and improve site engagement.
Displaying Categories on Your Website
Default Category Display
Most WordPress themes automatically display categories in:
- Category archives (yoursite.com/category/category-name)
- Post metadata (showing which categories a post belongs to)
- Category widgets in sidebars
Using WordPress Widgets
- Go to Appearance > Widgets
- Add the “Categories” widget to your sidebar or footer
- Configure display options (show post counts, hierarchy, etc.)
Custom Category Display with HT Mega
For more advanced category displays, you can use HT Mega’s Category List Widget for Elementor:

Benefits of HT Mega Category List Widget:
Here are some benefits of using Category list widget of HT Mega WordPress plugin:
- Custom Styling: Design category lists that match your brand
- Advanced Layouts: Choose from multiple display styles
- Post Count Display: Show how many posts are in each category
- Icon Integration: Add custom icons to categories
- Responsive Design: Ensure categories look great on all devices
- Filtering Options: Display specific categories or exclude certain ones
How to Use HT Mega Category List Widget:
Step 1: Enable the Category List Widget
- Go to HT Mega > Settings in your WordPress dashboard
- Enable the Category List widget option
- Click Save Changes to activate the feature
Step 2: Access Your Page for Editing
- Navigate to Pages > All Pages
- Open the desired page where you want to display the category list
- Edit the page with Elementor
Step 3: Add the Category List Widget
- In the Elementor editor, search for “Category List Widget”
- Drag and drop the widget to your desired position on the page
Step 4: Configure Category Items
- Click “Add Item” to start adding categories
- For each category item, configure:
- Search Category: Select the specific category to display
- Content Source: Choose your content source
- Choose Category: Pick the category from your site
- Choose Color: Set the text color for the category
- Background Color: Set the background color
- Click “Add Items” to add more categories as needed
Step 5: Customize Styling and Layout
Fine-tune your category list appearance with these options:
- List Position: Adjust the alignment and positioning
- Font Color: Customize text colors
- Border Type: Choose border styles
- Border Radius: Set rounded corners
- Box Shadow: Add shadow effects for depth
- Margin: Adjust spacing around elements
Step 6: Preview and Publish
- Preview your changes to see how the category list looks
- Make any final adjustments
- Update/Publish your page when satisfied
This gives you much more control over how categories appear on your site compared to default WordPress widgets.
Video Presentation
Frequently Asked Questions
Can I change category names after creating?
Yes, you can edit category names anytime. Go to Posts > Categories, hover over the category name, and click “Edit.” You can modify the name, slug, description, and parent category without affecting your posts.
How many categories should I create total?
Most websites work best with 5-10 main categories. Too many categories can confuse visitors and dilute your content organization. Focus on broad topics that represent your core content themes.
Do categories affect my website SEO rankings?
Yes, categories help SEO by creating site structure and internal linking. They help search engines understand your content organization and can appear in URLs, making them valuable for keyword optimization.
Can one post belong to multiple categories?
Absolutely! Posts can be assigned to multiple categories, but it’s best practice to limit this to 2-3 relevant categories to avoid over-categorization and maintain clear content organization.
What happens to posts when deleting categories?
When you delete a category, WordPress automatically moves all posts from that category to the “Uncategorized” default category. No posts are lost, but you should reassign them to appropriate categories.
Conclusion
Adding categories to WordPress is a fundamental skill that significantly improves your site’s organization and user experience. Now that you know how to add a category in WordPress using multiple methods, you can start creating a logical content structure that benefits both your visitors and search engines.
Remember that good categorization is an ongoing process. Regularly review and refine your category structure as your content grows and evolves. Well-organized categories not only help your visitors find content more easily but also contribute to better SEO performance and overall site usability.
The key is to think strategically about your content organization from the beginning and use categories as a foundation for your site’s information architecture.