
Quick Answer: To add a flip box in WordPress with Elementor Free, install and activate HT Mega, enable the Flip Box widget from HT Mega Addons → Settings → Elements, open your page with Elementor, and drag the HT Mega Flip Box widget (marked with the “HT” badge) onto the page. Then customize the front and back content, choose a layout, adjust the height and animation, style the widget, and publish your changes — no Elementor Pro required.
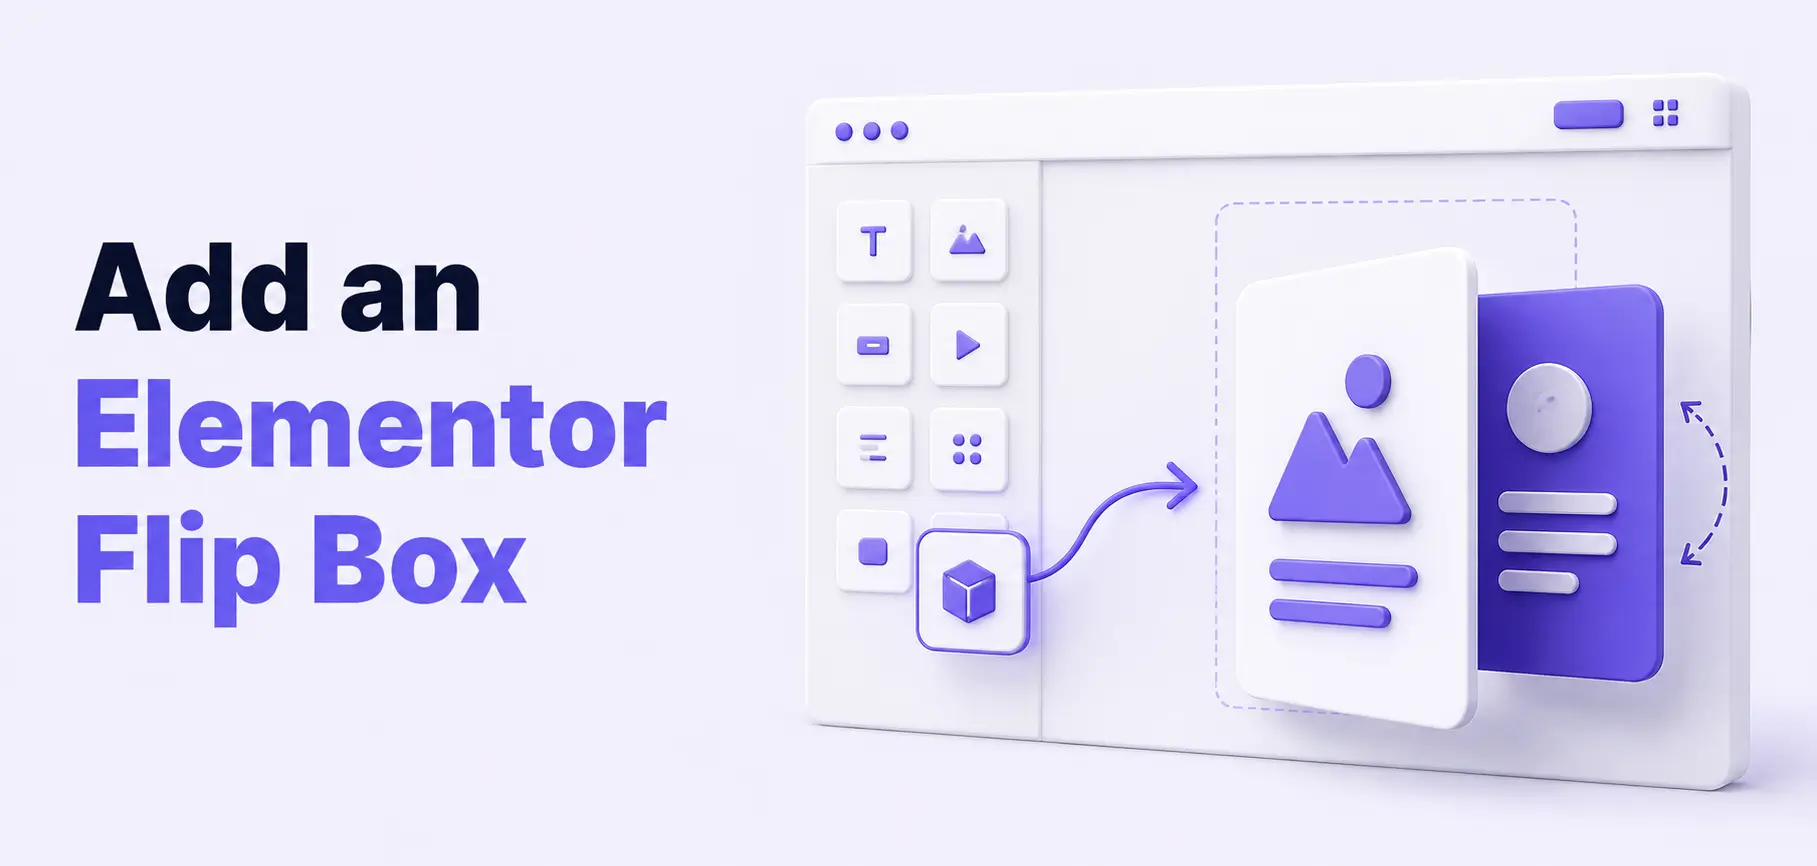
Flip boxes are interactive design elements that add visual appeal and engagement to your WordPress website. When visitors hover over a flip box, it elegantly rotates to reveal additional content on the back side. This dynamic effect is perfect for showcasing services, team members, product features, or any content you want to present in an eye-catching way.
This tutorial specifically shows how to create a flip box with Elementor Free using the HT Mega Flip Box widget, so you don’t need Elementor Pro’s native Flip Box widget. Whether you’re a beginner or an experienced user, this step-by-step guide will help you create interactive flip box effects in minutes.
Table of Contents
What is a Flip Box?
A flip box is an interactive UI component that displays two sides of content. The front side shows initial information, while the back side reveals additional details when a user hovers over or taps on it. The transition between sides creates an engaging 3D flip animation that captures attention and encourages interaction.
Flip boxes are commonly used for:
- Showcasing team members with photos on the front and bios on the back
- Presenting services with icons on the front and descriptions on the back
- Highlighting product features in an interactive format
- Creating compelling calls-to-action that reveal more information
- Adding visual interest to portfolio sections
Prerequisites
Before you begin, make sure you have:
- A WordPress website installed and running
- Elementor plugin installed (the free version works for this tutorial)
- HT Mega Addons for Elementor installed and activated
- Basic familiarity with the WordPress dashboard
- A page or post where you want to add the flip box
If you haven’t installed Elementor yet, go to Plugins → Add New in your WordPress dashboard, search for “Elementor,” and click Install Now, then Activate. Then install HT Mega Addons for Elementor the same way by searching for “HT Mega.”
Why Use HT Mega to Add a Flip Box in Elementor Free?
Elementor’s own native Flip Box widget is a Pro-only feature. If you’re using the free version of Elementor, you can still create a flip box by pairing it with the HT Mega Flip Box widget, a dedicated widget built into HT Mega’s addon library that does not require Elementor Pro.
The HT Mega Flip Box widget gives you:
- Five different layout options to choose from
- Separate front and back content controls (icon, title, description, number, and button)
- Height and animation controls under Additional Options
- Full front and back styling options for backgrounds, typography, and borders
For the complete reference, see the official HT Mega Flip Box widget documentation.
How to Add a Flip Box in WordPress: Step-by-Step Guide
Step 1: Enable the HT Mega Flip Box Widget
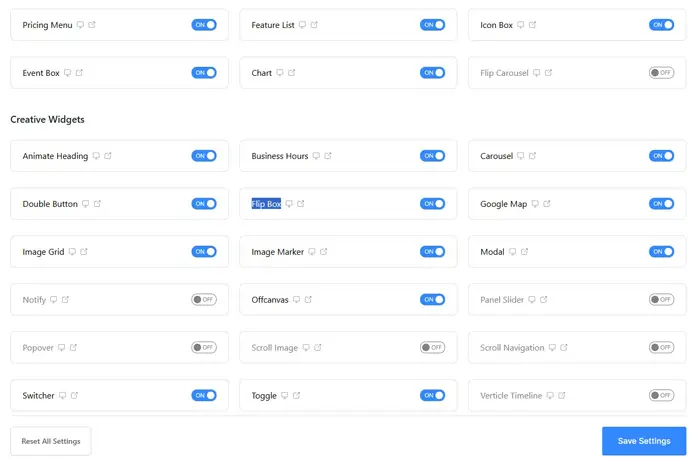
Go to WordPress Dashboard → HTMega Addons → Settings → Elements. From the list of elements, turn ON the “Flip Box” widget, then click Save Changes. This step is required before the widget will appear inside the Elementor editor.
Step 2: Open the Page with Elementor
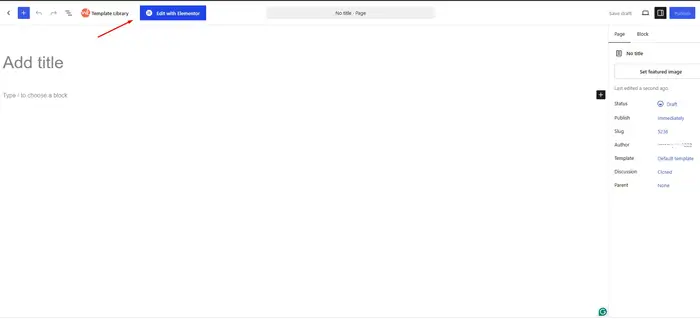
Navigate to the page where you want to add your flip box. You can create a new page (Pages → Add New) or edit an existing one. Click the “Edit with Elementor” button to launch the Elementor page builder interface.
Step 3: Search for the HT Mega Flip Box Widget
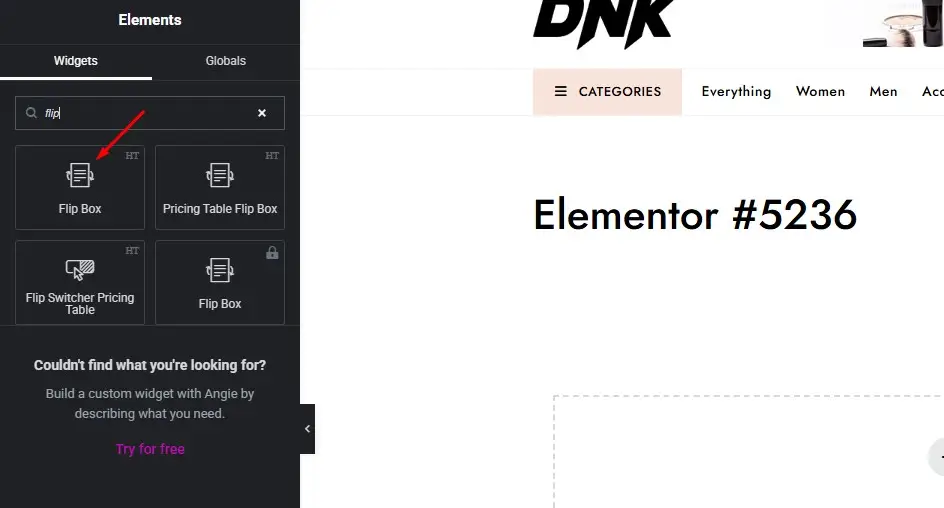
In the Elementor editor, use the search box at the top of the left sidebar and type “Flip Box.” Make sure you select the widget that has the “HT” badge — this identifies it as the HT Mega Flip Box widget rather than a flip box from another plugin.
Step 4: Drag and Drop the Widget
Once you’ve found the HT Mega Flip Box widget, drag it to your desired location on the page. You can place it in any section or column of your layout. Drop it where you want the flip box to appear, and Elementor will insert it with default content.
Step 5: Choose a Layout
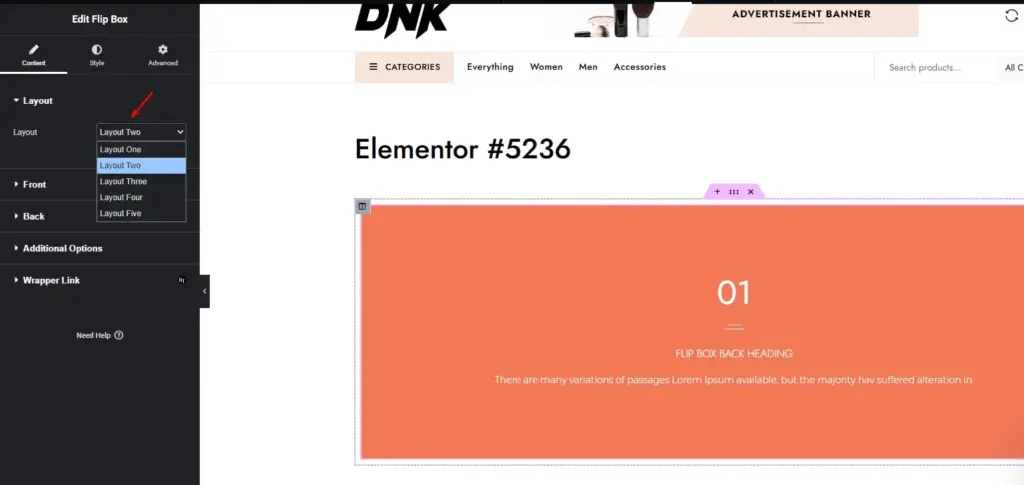
HT Mega currently provides five Flip Box layouts. Preview each option in the Layout setting under the Content tab and choose the one that best fits your content and page design.
Step 6: Customize the Front Side
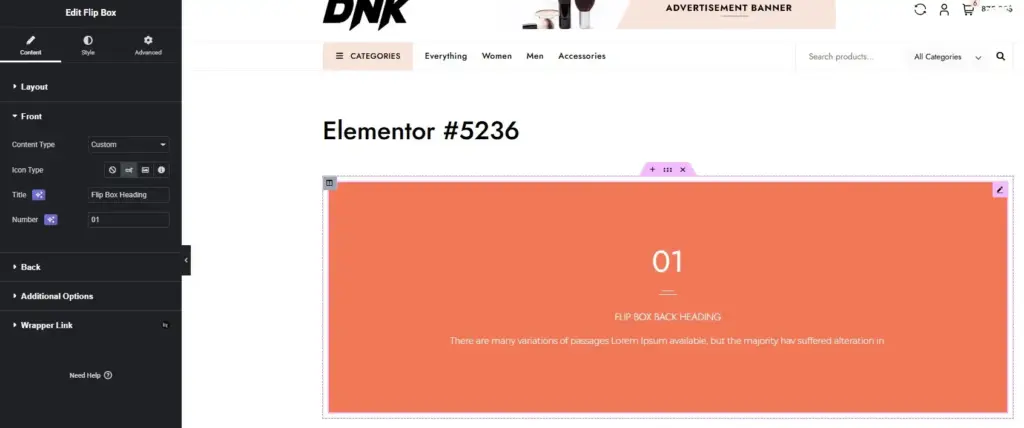
Under the Front tab, configure the content shown before the flip:
- Icon Type: Choose the icon that appears on the front
- Title: Enter a compelling title that summarizes what the flip box is about
- Number: Optionally display a number instead of, or alongside, an icon
Step 7: Customize the Back Side
Switch to the Back tab to configure what appears after the flip:
- Icon Type: Choose Icon, Image, or Number for the back side
- Title: Add a title for the back side (this can differ from the front)
- Description: Include the main content, details, or a short call-to-action message
- Button Text and Link: Optionally add a button with custom text and a destination URL
Step 8: Adjust Height and Animation
Under Additional Options, you can adjust the Height of the flip box to make sure both sides fit properly, and control the Animation used for the flip transition. Test these settings in the preview to ensure the flip looks smooth on your page.
Step 9: Style Your Flip Box
The Style tab lets you customize both the Front and Back independently, including background type and color, borders, spacing, and typography for the title and description. Use contrasting colors between the front and back to make the flip effect more noticeable.
Step 10: Preview on Desktop, Tablet, and Mobile
Before publishing, use the responsive mode icons at the bottom of the Elementor panel to preview your flip box on desktop, tablet, and mobile. Because hover behaves differently on touch devices, it’s worth testing on an actual phone or tablet rather than relying only on Elementor’s built-in preview.
If the flip effect doesn’t behave well on mobile, simplify the animation or check for interaction options available in your installed HT Mega version.
Step 11: Publish Your Changes
Once you’re satisfied with your flip box design, click “Publish” or “Update” at the bottom left of the Elementor editor. Your flip box is now live on your WordPress website.
Note: To learn more, visit: How to use a Flipbox Widget of HTMega Addons.
Recommended Blogs For You:
👉 HT Mega Flip Box Widget: Features and Options
👉 How to Use the HT Mega Flip Box Widget
👉 5 Best Elementor Flip Box Plugins for WordPress
👉 Best Elementor Flip Carousel Widget
👉 How to Add Sticky Content in Elementor
Best Practices for Using Flip Boxes
- Keep content concise. Both sides of the flip box should contain clear, scannable information. Avoid overcrowding either side with too much text.
- Use high-quality images. If you’re using images on the front or back, ensure they’re properly sized and optimized for web performance, since large images can slow down the flip animation.
- Maintain visual hierarchy. Make titles prominent and descriptions supportive so the user’s eye moves naturally through the content.
- Create contrast. Use contrasting colors between the front and back so visitors immediately notice the change.
- Test the user experience. Make sure your flip boxes work smoothly on touch devices, where hover effects may not apply.
- Avoid overloading a page. Use flip boxes selectively for related items such as services, team members, or feature highlights, and check page performance and mobile usability after adding them.
- Add clear calls-to-action. If you’re using buttons on the back side, make the button text action-oriented, such as “Learn More” or “Get Started,” rather than a generic “Click Here.”
Accessibility Considerations
Interactive elements like flip boxes need a bit more care to remain usable for everyone:
- Don’t place essential information only on the hidden back side — assume some visitors won’t trigger the flip
- Verify that any button or link inside the flip box is reachable and usable via keyboard navigation
- Test the interaction on an actual touch device, not just the Elementor responsive preview
- Avoid making critical information depend entirely on the flip animation completing
- Use sufficient color contrast between text and background on both the front and back
- Keep front and back content concise so it remains readable at different screen sizes
Troubleshooting Common Issues
- Flip box is not flipping: Check in this order: confirm the HT Mega Flip Box widget is enabled in HTMega Addons → Settings → Elements, save the settings, update the Elementor page, clear your site or browser cache, and then test for plugin or script conflicts if the issue remains.
- Wrong widget showing up: Make sure you’re selecting the Flip Box widget with the “HT” badge, not a flip box widget from another plugin.
- Content overflowing: If text extends beyond the flip box boundaries, adjust the height setting under Additional Options or reduce the amount of content. You can also adjust padding to create more space.
- Slow animation: Large images can slow down the flip effect. Optimize and compress images before uploading using tools like TinyPNG or a WordPress image optimization plugin.
- Mobile issues: Test your flip boxes on actual mobile devices, since hover effects don’t translate to touch screens. Simplify the animation or explore interaction options available in your installed HT Mega version if problems persist.
- Styling not applying: Clear your browser cache and any WordPress caching plugins, and confirm you’ve saved your changes in Elementor before viewing the live page.
Flip Box Use Case Examples
- Service Showcase: Create a row of flip boxes highlighting your main services. Use icons on the front with service names, and detailed descriptions with “Learn More” buttons on the back.
- Team Member Profiles: Display team photos on the front with names and titles. Flip to reveal brief bios and contact details on the back.
- Product Features: Showcase key product features with feature icons on the front. Flip to reveal detailed explanations and benefits of each feature.
- Statistics & Achievements: Display impressive numbers on the front, such as “500+ Projects Completed.” Flip to show more context about what those numbers mean.
- Pricing Tiers: Present pricing plan names and monthly costs on the front. Flip to reveal what’s included in each plan with a “Choose Plan” button.
If you need dedicated pricing flip cards instead, check the Pricing Table Flip Box widget.
Frequently Asked Questions
How do I add a flip box in WordPress with Elementor?
Enable the HT Mega Flip Box widget from HTMega Addons → Settings → Elements, then open your page in Elementor and search for “Flip Box.” Drag the widget with the “HT” badge onto your page, customize the front and back content, adjust the layout and animation, and publish.
Can I create a flip box with Elementor Free?
Yes. You can create a flip box without Elementor Pro by using Elementor Free together with the HT Mega Flip Box widget. Elementor’s own native Flip Box widget is a Pro feature, but HT Mega provides its own Flip Box widget that works with Elementor Free and lets you build interactive flip box layouts without upgrading to Elementor Pro.
Do I need HT Mega to follow this tutorial?
Yes. This tutorial uses the HT Mega Flip Box widget, so you’ll need to install and activate HT Mega and enable the Flip Box widget in its settings before it appears in the Elementor editor.
What can I display inside an Elementor flip box?
Flip boxes can contain icons, images, titles, descriptions, numbers, and call-to-action buttons. The front side typically displays eye-catching visuals with a brief title, while the back side includes more detailed information, a description, and an optional button linking to another page.
How do I make a flip box work better on mobile devices?
Test the flip box on an actual touch device rather than relying only on Elementor’s responsive preview. If the animation doesn’t behave well on mobile, simplify the effect or check the interaction options available in your installed HT Mega version, and make sure the height setting suits smaller screens.
Can I add a button or link to the back of the flip box?
Yes. The Back tab includes Button Text and Button Link fields, letting you add a call-to-action button that directs visitors to another page, product, or contact form.
Conclusion
Now you know how to add a Flip Box in WordPress with Elementor Free using HT Mega. Enable the widget, add it from the Elementor editor, then set up the front and back content to suit the information you want visitors to see.
Before publishing, check the flip box on desktop and a real mobile device. Keep the text short, make the front and back easy to scan, and use the back-side button only when it leads to a relevant next step.
For more control over your Elementor setup, see our guide on Elementor Free vs Elementor Pro.