
Creating a photography website is essential for showcasing your talent, attracting clients, and establishing a professional online presence. With the help of this comprehensive lesson, you will discover how to create a photography website that effectively attracts visitors and displays your work.
This article will give you the knowledge and tools to create an online portfolio that showcases your unique photography style and skills. It covers choosing the right platform and including essential features for your portfolio.
Key Takeaways
- A photography website should showcase high-quality images highlighting photography skills and style.
- Ensure a seamless browsing experience with intuitive navigation and fast loading times.
- Learn about essential pages of portfolio websites.
- Optimize your photography business website for mobile devices, as many visitors will access it from smartphones or tablets.
- Organize the portfolio logically, possibly categorizing it by genre, location, or client type.
- Use essential plugins to improve your website’s performance and security.
Importance of a professional photography website
A professional photography website is essential for photographers for the following reasons:
- Showcase Portfolio: It serves as a digital portfolio where photographers can display their best work in high resolution, allowing potential clients to assess their skills and style.
- First Impressions: A well-designed website impresses visitors with professionalism and meticulous attention to detail, influencing potential customers’ decisions.
- Marketing Tool: As a marketing tool, a photography business website effectively promotes services, attracts new clients, and sets photographers apart from competitors.
- Online Presence: A website establishes a strong online presence, making it easier for clients to find and learn about the photographer through search engines and social media.
- Credibility and Trust: A professional website boosts credibility and builds trust by displaying testimonials, client reviews, and past work, highlighting the photographer’s expertise and reliability.
Recommended Blogs for You:
👉 Best Elementor Instagram Feed Widgets for Your Website
👉 Top 5 Elementor Banner Widgets for Stunning Website Design
👉 Top 6 WooCommerce Category Widgets: Enhance Your Online Store Navigation
👉 Top 6 Elementor Call to Action Widgets That Will Boost Your Conversions
👉 Best Elementor Post Grid Widget: Enhance Your Website Design
How to Create a Photography Website
Creating a photography website involves several key steps to ensure it effectively showcases your work and attracts clients. Here’s a general guide to get you started:
Step-1: Setting Up Your Domain and Hosting
Setting up your domain and hosting is a critical step in establishing your online presence. From selecting a domain name to choosing the right hosting provider and platform, each decision plays a vital role in the success of your website. Follow these steps for a seamless setup process:
- Selecting and Registering a Domain Name: Choose a memorable domain name that represents your brand well. Register it with a reliable domain registrar to secure your online identity.
- Choosing a WordPress-optimized hosting provider: Select a site hosting company that provides solid performance, support, and WordPress compatibility. Popular options for hosting providers:
1. WordPress hosting
2. Hostinger
3. Elementor hosting,
4. Namecheap
5. InMotion hosting. - Choosing the Right Platform for Your Photography Website: Choose a platform that meets the specific requirements of a photography website, taking into account factors like image optimization, portfolio display options, and ease of customization. Various platforms are accessible, including WordPress, Shopify, Webflow, etc. Note: We will choose WordPress for its flexibility, ease of use, and vast plugin ecosystem tailored for photographers.
- Installing WordPress: You can install WordPress quickly and easily using your web hosting provider’s dashboard. Most providers offer one-click installation options.
Step 2: Choosing and Installing a Photography-Focused Theme
Once your domain and hosting are set up, the next crucial step is selecting and installing a theme specifically designed for photography. Look for a theme that offers:
- Gallery Layouts: Multiple gallery options such as grid, masonry, slideshow, and carousel to showcase your photos effectively.
- High-Resolution Support: Compatibility with high-resolution images to maintain image quality and clarity.
- Customization Flexibility: We offer extensive customization options for colors, fonts, layouts, and styles to match your brand and personal style.
- Portfolio Features: Dedicated portfolio templates or sections with filters, categories, and tags for organizing and presenting your photography portfolio.
- Optimized Performance: Fast loading times and responsive design for seamless device browsing.
Recommended Themes
Snapster – Photography WordPress Theme
Snapster is a creative and feature-rich WordPress theme powered by the Aheto plugin for professional studios and photographers. It includes albums, galleries, events, fullscreen, proofing, photography, price lists, and blogs to create a unique website.
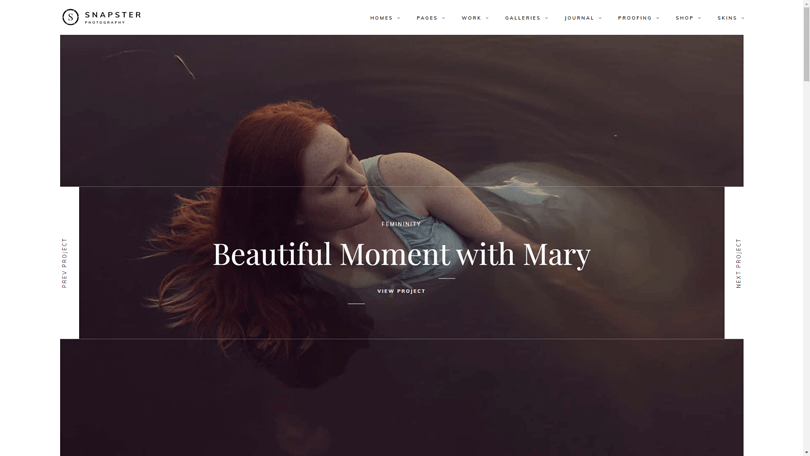
The theme is responsive and retina-ready, offering three homepages and a large collection of useful inner pages. Additionally, it features a Mega Menu for easy navigation.
Highlighted Features:
- No coding knowledge is required
- Responsive & Retina Ready
- 3 homepages
- Customizable
Price: Regular License: $49
Missio – Photography WordPress Theme
Missio is a stunning and creative WordPress theme for professional studios and photographers. It is fully responsive and mobile-friendly, packed with niche functionalities and blocks that ensure every feature looks amazing on tablets and mobile phones. It includes specialized page templates and layouts designed to create today’s most visually appealing and responsive environment.
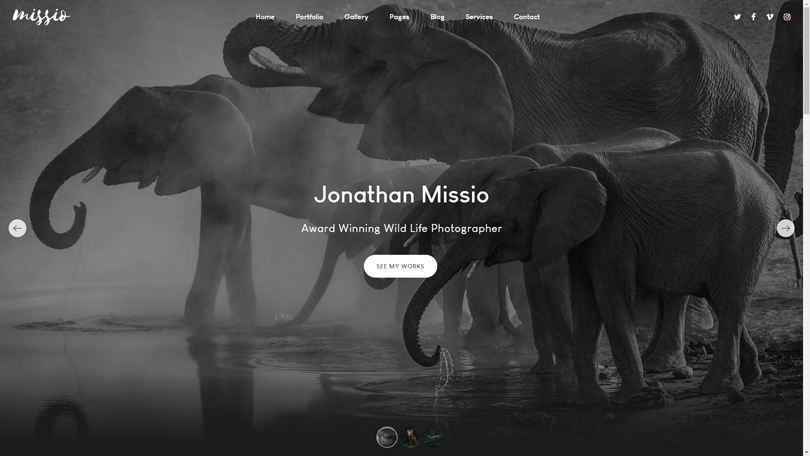
Highlighted Features:
- Unlimited Color Styles
- Blog Single Page
- Animate any Elements
- Responsive layout
Price: Regular License: $59
Fototag – Photography WordPress Theme
Fototag offers a clean, modern layout ideal for professional photography businesses. Customization is simple after importing 10+ premade homepage demos. It seamlessly integrates with the Slider Revolution plugin, creating stunning image sliders for any page.

The theme includes Elementor’s drag-and-drop page website builders for easy customization, ensuring responsiveness across all devices and SEO optimization.
Highlighted Features:
- 10+ Home Pages
- Responsive & Mobile Friendly.
- SEO Friendly
- Unlimited Color Combinations.
- Dynamic Page Header
Price: Regular License: $29
Step 3: Install Essential Plugins
Installing essential plugins can greatly enhance the functionality and performance of your photography website. Here are some key website builder plugins you should consider:
Elementor
Elementor revolutionizes photography portfolio websites by offering a pixel-perfect, drag-and-drop interface for effortless customization. Create stunning galleries and portfolios without coding, showcasing photography beautifully. With over 40 widgets and flexible design options, Elementor ensures your photography website stands out.
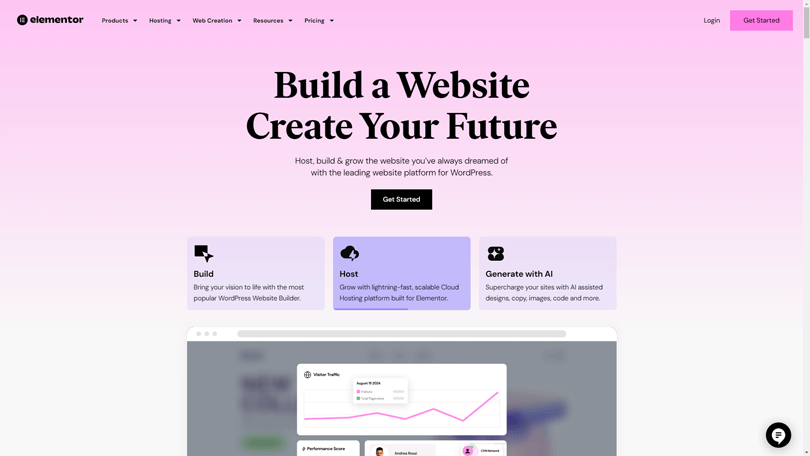
Highlighted Features:
- Pixel-perfect websites
- Advanced capabilities
- Full website kits and template library
- Fully responsive
- 40+ free widgets
Pricing: The pricing plans for Elementor:
- Essential Plan: $4.92/Mo
- Advanced Plan: $8.25/Mo
- Expert Plan: $16.58/Mo
- Agency Plan: $33.25/Mo
HT Mega
HT Mega is a comprehensive wordpress plugin design to integrate with Elementor. It features many widgets and pre-designed templates, empowering users to create professional websites effortlessly. This plugin has 100+ free elementor widget, 170+ free template and 760+ Elementor Blocks. These help make your photography website look amazing.

HT Mega is like a awesome tool that helps you design your website better. You can create beautiful galleries, add fun interactive things, and choose nice layouts easily. HT Mega lets you make a special website that shows off your photos in the best way. Use HT Mega to make your Elementor website awesome and make your photography website look even better and more professional.
Highlighted Features:
- 110+ Widgets 14 Essential Modules
- 760+ Ready Blocks
- Responsive on all platforms
- SEO Friendly Design
Pricing: HT Mega’s free version is available on WordPress repository and HT Mega Pro version has 2 different pricing plans.
Yearly Plans:
- Personal Plan: $49/ Yearly(For 1 Website)
- Developer Plan: $79/ Yearly(For 5 Websites)
- Growth Plan: $99/ Yearly(For 999 Websites)
One-Time Plans:
- Personal Plan: $99 /One Time Fee(For 1 Website)
- Developer Plan: $149 /One Time Fee(For 5 Websites)
- Growth Plan: $199 /One Time Fee(For 999 Websites)
HT Easy GA4
HT Easy GA4 seamlessly integrates Google Analytics 4 with WordPress, providing comprehensive traffic insights. Its intuitive interface simplifies setup, ensuring quick access to detailed analytics with minimal clicks. From monitoring site visits to user interactions and engagement metrics, HT Easy GA4 supports informed decision-making to optimize website performance.

A user-friendly web design and seamless navigation empower users to effectively use Google Analytics on their WordPress site, enhancing data-driven decision-making and maximizing online presence.
Highlighted Features:
- Quick and Easy Setup
- WooCommerce Integration
- Affiliate Link Tracking
- Standard & E-commerce Reports
- Chart Comparison Over Time Periods
Pricing: Pricing plans for HT Easy GA4:
- Personal Plan: $59/ Yearly
- Developer Plan: $99/ Yearly
- Agency Plan: $199/ Yearly
Pixalavo
Pixelavo is a powerful plugin that simplifies setting up the Facebook Pixel on your website. It enables the seamless integration of the Facebook Pixel, allowing you to collect essential data about your store’s visitors.
This data can create highly targeted and personalized Facebook ads, enhancing your marketing efforts and driving better results. With Pixelavo, optimizing your online store’s advertising strategy becomes quick, easy, and effective.
Highlighted Features:
- Seamless integration
- Event tracking
- Custom event tracking
- Real-time event tracking
- Create Custom Event
Pricing: Pricing plans for Pixalavo
- Personal Plan: $99/ Yearly
- Developer Plan: $149/ Yearly
- Agency Plan: $199/ Yearly
Support Genix
Support Genix is a top-tier customer support ticket software for your WordPress site. It allows users to create tickets and receive assistance directly from your website. Support Genix supports unlimited tickets, users, and agents, ensuring efficient support management.
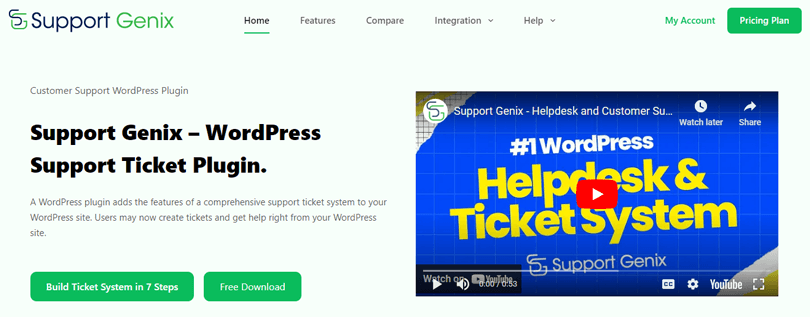
It also includes business email accounts for centralized customer inquiry handling. Highlighted features include agent roles, filters and sorting, and ticket status tracking. Start today to experience enhanced efficiency and organization with Support Genix.
Highlighted Features:
- Agent Roles
- Filters and Sorting
- Ticket Status
- Unlimited Tickets
Pricing: There are 2 different pricing for Support Genix:
Yearly
- Personal Plan: $59/year
- Developer Growth Plan: $99/year
- Agency Plan: $149/year
Lifetime
- Personal Plan: $99/Lifetime
- Developer Growth Plan: $199/Lifetime
- Agency Plan: $399/Lifetime
WooCommerce
WooCommerce is a free and flexible platform for online stores supported by a worldwide community. It gives you the freedom of open-source, meaning you have complete control over your store’s content and data.

Whether you’re starting a new business, moving your physical store online, or building websites for clients, WooCommerce smoothly combines content and online sales.
Design attractive online shops using themes that match your brand, boost sales with a simple shopping cart, and personalize product pages with different sections to display various products like physical goods, digital items, and affiliate products.
Highlighted Features:
- Beautiful storefronts with themes
- Customize product pages
- Product and Catalog Management
- Marketing and SEO
Pricing: Free
ShopLentor
ShopLentor is an all-in-one solution for WooCommerce, simplifying your online store management by consolidating several plugins into one convenient tool. It enables you to design attractive layouts for your WooCommerce pages with ease.
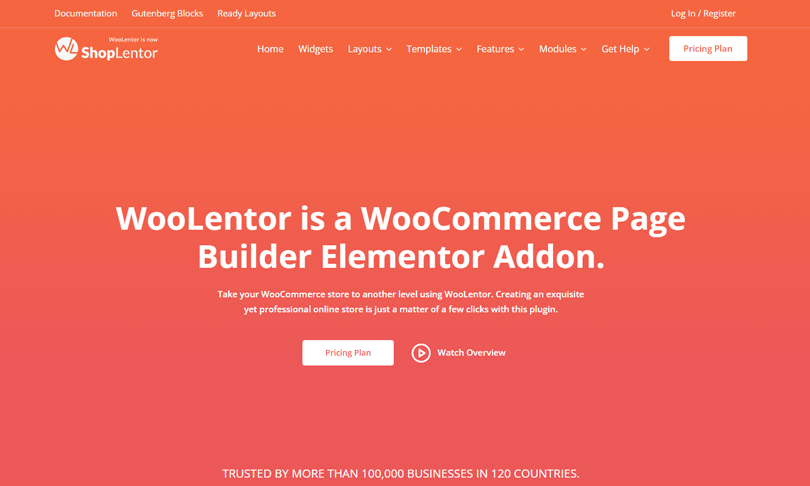
The user-friendly WooCommerce page builder within ShopLentor lets you personalize Shop, Cart, Checkout, and other key pages. Moreover, you can create unique archive page layouts for specific product categories, enhancing the overall look and functionality of your eCommerce website.
Highlighted Features:
- 105+ WooCommerce Elementor Widgets
- WooCommerce Page Builder
- GTM Conversion Tracking
- Checkout Page Customization
Pricing: There are 2 different pricing plans for ShopLentor:
Yearly Plans:
- Plus Plan: $59/ Year
- Elite Plan: $159/ Year
- Agency Plan: $299/ Year
- Bundle Plan: $499/ Year
One-time Plans:
- Plus Plan: $149/ one time
- Elite Plan: $259/ one time
- Agency Plan: $599/ one time
- Bundle Plan: $699/one time
Step 4: Adding Essential Pages of photography Website
When creating a photography website, certain pages are essential to engage visitors, effectively showcase your work, and drive conversions. Here are some key pages that should be included in a photography website:
Homepage: The homepage is the visual gateway showcasing the photographer’s best work and unique style. Engage visitors with stunning images and easy navigation to explore the site further.
About Page: The about page provides insights into the photographer’s background, experience, and artistic vision. Share personal anecdotes, awards, and achievements to connect with the audience authentically.
Service Page: Detail the photography services you offer on this page. This could include individual portraits, family sessions, event coverage, product photography, and more
Contact Page: The contact page is vital for enabling clients to reach out for bookings or inquiries. Include a contact form, email address, and social media links for seamless communication.
Portfolio/Gallery: The portfolio page displays a curated selection of the photographer’s best work across genres. Showcase high-resolution images in organized galleries to highlight expertise and creativity.
Step 5: Customize Your Site
Customizing your photography site may be challenging and time-consuming. Using HT Mega’s powerful tools and widgets, you can easily increase the functionality of your photography website. Let’s have a look at how these features reflect your unique style-
Homepage
Creating a home page for your photography website with HT Mega’s Elementor widgets ensures a dynamic and engaging user experience. Start by using the Elementor Heading Widget to craft compelling headlines that draw visitors in, followed by the Post Carousel and Post Grid Widgets to display your latest work and featured projects beautifully. Incorporate the Call to Action Widget to guide visitors towards booking your services, and use the WPForms Widget to create seamless contact forms, making it easy for potential clients to reach out.
About Page
The About page is an essential page of a photography website. To customize the About page, you can use HT Mega’s Team Member and Testimonial widgets. Use the Team Member widget to introduce yourself and any collaborators, adding photos and detailed bios to give a personal touch. The Testimonial widget allows you to showcase client feedback and success stories, building credibility and trust with potential clients.
Contact Page
For your Contact page, embed a contact form using the Contact Form 7 widget. This widget enables you to create a user-friendly and efficient form, allowing visitors to get in touch with you for inquiries or bookings easily. Customize the form fields to gather essential information and ensure seamless communication with your audience.
Portfolio/Gallery
Display your stunning images in the Portfolio or Gallery section using the Gallery and Grid widgets. The Gallery widget helps you create visually appealing photo galleries, while the Grid widget allows for an organized and elegant presentation of your work. These widgets ensure your portfolio looks professional and is easy to navigate, making a strong impression on visitors.
Step 6: Creating and Organizing Image Galleries
Creating and organizing image galleries can be a daunting task, but fear not, as HT Mega offers features that can simplify the process for you effortlessly. Using HT Mega’s Elementor widgets, you can leverage the versatile Gallery and Grid widgets. These widgets offer customizable layouts to beautifully showcase your photography work on your website. With features like thumbnails, masonry layout, and display options, HT Mega’s widgets provide a visually appealing way to present your images effectively to your audience. Whether you’re looking to display a portfolio, a gallery of events, or product images, HT Mega’s widgets make it easy to create stunning and organized image galleries that capture attention and engage visitors effectively.
Step 7: Optimizing Images for Performance
Optimizing images is key to speeding up your site and improving SEO. Smaller, resized images load faster, making the user experience smoother and reducing bounce rates. Lazy loading loads images as they appear, boosting site speed without compromising accessibility.
These practices improve page load times, crucial for SEO, helping photographers create fast, discoverable websites that satisfy users and rank well in search engines.
Step 8: Integrating E-commerce Functionality
To monetize your photography, set up WooCommerce or Easy Digital Downloads to sell your photographs online. The first step should be to install and configure the plugin of your choosing to properly list your products.
Utilize HT Mega’s WooCommerce widgets, such as add-to-cart and categories within Elementor, to enhance product displays, ensuring visually appealing and informative showcases of your photography. Configure payment gateways such as PayPal or Stripe and adjust shopping cart settings to provide a seamless purchasing experience for your customers.
This integration allows you to use your photography skills to create a profitable online business, reach more people, and sell your work directly on your website.
Step 9: Final Touches and Launching Your Site
Thoroughly test your photography website before launching to ensure it performs well and is easy to use. Check for speed, responsiveness on all devices, and the functionality of features like forms, galleries, and e-commerce elements. Make final tweaks and customizations to ensure the design and content look polished and professional.
Once satisfied, launch your website, making it live to the public. Promote your photography website through social media, email newsletters, and collaborations with other creatives or businesses to attract visitors and potential clients. Maintain and refresh your website often to keep visitors interested and engaged.
Frequently Asked Questions
How to create a free photography website?
To create a free photography website, sign up on platforms like WordPress, Wix, or Weebly. Choose a template, customize it with your content and images, and then publish your site for free!
What is needed for a photography website?
Essential elements for a photography website include high-quality images, a portfolio section, contact information, an about page, client testimonials, and easy navigation for a seamless user experience.
What is the main purpose of a photography website?
The main purpose of a photography website is to display your work, attract potential clients, showcase your style and expertise, build credibility, and provide a platform for client interaction and inquiries.
How do you optimize images to load faster?
To speed up image loading, resize them to the right dimensions and compress them using tools like TinyPNG. Use lazy loading and choose the correct file format (JPEG or WebP) for web usage.
What plugins are essential for a photography website?
Essential plugins for a photography website include SEO tools like Yoast SEO and image optimization plugins like WP Smush. Additionally, gallery plugins like Envira Gallery and WPForms can be used for client communication.
Can you sell photos on your own website?
Yes, you can sell photos on your website by integrating e-commerce plugins like WooCommerce or platforms like Shopify. Set up a secure payment gateway, create pricing options, and ensure high-resolution image delivery to customers.
Conclusion
In short, creating a photography website is vital for showcasing your work and growing your online presence in the competitive photography industry. A website for your photography business can be an effective tool for growing your clientele and reach.
To enhance the visibility of your online portfolio and propel your photography career, make sure your website is search engine optimized and interact with your audience on several platforms.