
Your WooCommerce product page is where visitors finally decide to buy or abandon their cart. Elementor gives you visual control over layout, and HT Mega adds powerful WooCommerce and design widgets so you can build a product page that actually converts, not just looks decent.
Default WooCommerce templates are generic. They rarely reflect your brand or answer the real questions buyers have about price, trust, and value. A custom WooCommerce product page with Elementor and HT Mega lets you reorder content, highlight benefits, and add interactive elements that move visitors toward the Add to Cart button.
Quick Takeaway (TL;DR)
- Use Elementor’s Theme Builder to create a Single Product template for WooCommerce.
- Install and activate HT Mega, then use its WooCommerce and Theme Builder widgets (WC: Add To Cart, WC: Categories, Post Title, Post Featured Image, Post Content, etc.) to design your layout.
- For advanced visuals and conversions, HT Mega Pro adds widgets like 360 Rotation and Copy Coupon Code, plus Parallax, Particles, and Conditional Display modules.
Why Your WooCommerce Product Page Needs a Custom Layout
By default, WooCommerce product pages output title, gallery, price, and add‑to‑cart controls in a fixed order. That works, but it doesn’t consider your unique positioning, brand, or how your ideal buyer decides.
Baymard Institute’s consolidated research shows average cart abandonment rates around 70% across eCommerce, with some verticals even higher on mobile.
Shopify’s more recent breakdown similarly reports abandonment rates above 60% for many stores. That means every improvement on product and checkout pages can directly impact revenue, especially around clarity, trust, and friction.
With Elementor and HT Mega, you can:
- Reorder product details (title, media, price, add to cart, guarantees) based on what your buyers need to see first.
- Add interactive visuals such as galleries and 360° views using HT Mega’s creative widgets.
- Reuse one Single Product template across all products, so you design once and roll it out across your store.
If you want a deeper overview of how Elementor can power a full business site, you can also look at HT Mega’s guide on building a business website with Elementor for a broader context.
What You Need Before You Start
To follow this tutorial, you need:
- A WordPress site with WooCommerce installed and at least one product created.
- Elementor is installed (HT Mega works with free Elementor).
- The HT Mega – Absolute Addons for Elementor plugin is installed and activated from WordPress.org.
HT Mega is a comprehensive Elementor addon that includes over 130 widgets (about 100 in free, plus dozens more in Pro), along with templates, blocks, and essential modules. It covers WooCommerce widgets such as WC: Add To Cart and WC: Categories, as well as Theme Builder widgets like Post Title, Post Content, Post Featured Image, and Archive Posts.
Building a High-Converting WooCommerce Product Page with Elementor: Step by Step
If you want access to advanced design and conversion features like 360 Rotation, Copy Coupon Code, Filterable Gallery, and Parallax effects, you can upgrade to HT Mega Pro from the pricing page, which currently offers tiered plans and up to around 60% off discounts depending on the license.
Step 1: Activate the Right HT Mega Widgets and Modules
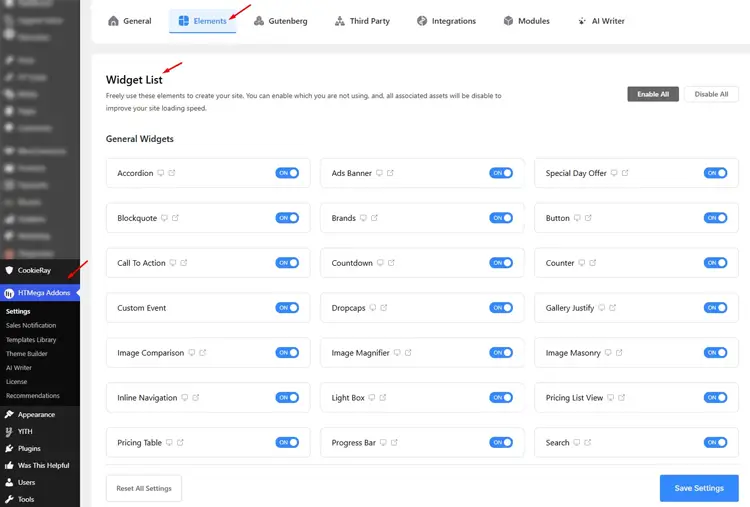
After activating HT Mega, you should enable only the widgets and modules you plan to use to keep your site lean and performant.
Go to:
- WordPress Dashboard → HTMega Addons → Settings → Elements for general widgets.
- WordPress Dashboard → HTMega Addons → Settings → Third Party for WooCommerce and other integrations.
- WordPress Dashboard → HTMega Addons → Settings → Modules for Theme Builder, Mega Menu, and other global modules.
For a WooCommerce product page, make sure you enable:
WooCommerce widgets (free):
- WC: Add To Cart – a customizable add‑to‑cart button with quantity and price controls.
- WC: Pages – lets you output core WooCommerce pages like Checkout.
- WC: Categories – shows all available categories with images and styling controls.
Theme Builder widgets (free)
- Post Title
- Post Content
- Post Excerpt
- Post Featured Image
- Post Meta Info
- Post Comments
- Archive Posts
- Archive Title
- Page Title
- Site Title / Logo
- Nav Menu
- Search Form
- Sidebar
Useful free modules
- Theme Builder: To design headers, footers, and layouts like a single product without coding.
- Mega Menu Builder: To build a multi‑column store menu.
- Sales Notification: To show recent purchase popups for social proof. Scroll To Top, Wrapper Link, Reading Progress Bar, Floating Effects, Post Duplicator – general UX and productivity helpers.
If you already have HT Mega Pro, also enable:
Pro widgets that help product pages
- 360 Rotation: Show products with interactive 360° views.
- Copy Coupon Code: Display a code and let users copy it with one click.
- Filterable Gallery: Group product images into filterable categories.
- Video Gallery/Video Playlist: Embed demos, reviews, or usage videos.
- Chart: Visualize comparative data or specs. Facebook Review, WhatsApp Chat, and other social proof/communication widgets.
Pro modules
- Parallax Effect
- Particles Effect
- Conditional Display
- Advanced Sticky
- Custom CSS per widget
- Cross‑Domain Copy Paste
Step 2: Create a Single Product Template in Elementor
Elementor’s Theme Builder lets you create a Single Product template that overrides WooCommerce’s default product layout.
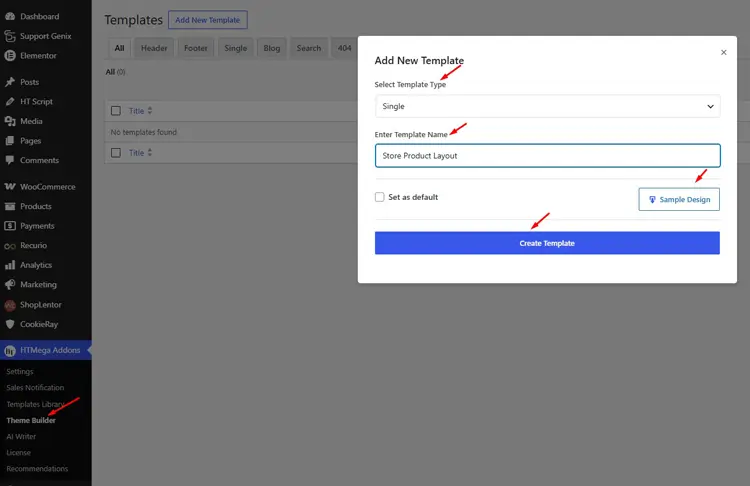
In your WordPress dashboard:
- Go to Templates → Theme Builder → Single Product → Add New.
- Choose Single Product, name it (for example, “Store Product Layout”), and click Create Template.
- Elementor will show an option to load a pre‑built template. For full control and to showcase HT Mega, you can start with a blank template.
The editor will load with one of your products as a live preview, so you can design in context and see dynamic content updates as you go.
Step 3: Plan Your Product Page Structure for Conversions
Before dragging widgets, plan your layout. A clear structure helps your buyer answer three questions quickly:
- What is this product?
- Why should I trust it?
- How do I buy it now?
A proven, conversion‑oriented layout often includes:
- Product title and breadcrumb
- Product image gallery (or 360° view)
- Price, stock status, and key benefits
- Add to Cart button and quantity selector
- Short bullet‑based benefit list
- Trust elements: reviews, ratings, guarantees, badges
- Detailed description, specifications, and FAQs
- Related products or category links
In Elementor + HT Mega, a simple but effective layout could be:
- Section 1 – Hero (two columns)
- Left: product gallery / featured image / 360 Rotation (Pro).
- Right: title, rating, price, short description, WC: Add To Cart, trust badges.
- Section 2 – Details
- Tabs or Accordion for Description, Specs, Shipping & Returns, and FAQ.
- Section 3 – Navigation/recommendations
- WC: Categories, Category List (Pro), or related products for further discovery.
This structure matches what shoppers expect on modern product pages and is easy to implement with the widgets you’ve enabled.
Step 4: Add Core WooCommerce and HT Mega Widgets
4.1 Build the main product info area
In your Single Product template:
- Add a new two‑column section, for example 50% / 50%.
- In the left column:
- Add Post Featured Image to show the main product image.
- If you use a gallery or HT Mega’s Filterable Gallery (Pro), place it here so users can explore visuals.
- In the right column:
- Add Post Title, which acts as the product title in a Single Product context.
- Add a star rating widget (from WooCommerce or an addon) if you use product reviews.
- Add a short description using either Post Excerpt or a Text Editor widget bound to the WooCommerce short description dynamic tag.
- Drag in WC: Add To Cart to output the Add to Cart button, price, and quantity selector, all tied to the current product.
All of these widgets pull data dynamically from the product you’re previewing, so the same template will work for your entire catalog.
4.2 Show detailed description and supporting information
Below the hero area:
- Add a full‑width section.
- Choose one of these patterns:
- Use Tabs or Accordion (from HT Mega or Elementor) with titles like “Description”, “Specifications”, “Shipping & Returns”, and “FAQ”, then place your content inside those panels.
- Or use Post Content to output the main WooCommerce description and organize it with headings and lists in the product editor.
Tabs and accordions help keep the page compact and easier to scan, especially on mobile devices.
Step 5: Add catalog navigation and category context
Good navigation reduces friction and helps users find alternatives if a product isn’t quite right.
Use HT Mega to support this:
- WC: Categories (free): Display product categories with images in a grid, encouraging users to browse other groups of products.
- Elementor Category List widget (Pro): If you want more advanced layouts, icons, or typography, use the dedicated Category List widget and style it as a section of your product page.
- Breadcrumbs (Pro): Add breadcrumb navigation above the product title so users can easily move back to category or shop pages.
Practical placement:
- Breadcrumbs: At the top of the template, above the hero section.
- WC: Categories or Category List: Near the bottom, under the main content as a “More to explore” section.
This approach aligns with common best practices in HT Mega’s own WooCommerce and taxonomy‑focused content.
Step 6: Enhance your product page with HT Mega Pro
Once you have a working layout, you can selectively add HT Mega Pro features to differentiate your store and improve conversions.
High‑impact Pro options for product pages include:
- 360 Rotation: Let shoppers rotate the product and view it from multiple angles. Ideal for physical products like shoes, jewelry, or gadgets.
- Copy Coupon Code: Show a discount code near the Add to Cart area with a one‑click “Copy” button to reduce friction and encourage checkout.
- Filterable Gallery: Display product images with category filters such as “In Use”, “Details”, and “Packaging”. This helps shoppers explore the product more deeply.
- Video Gallery / Video Playlist: Add product demo videos, tutorials, or testimonials directly on the product page.
- Parallax and Particles modules: Apply modern scroll and background effects to hero or promotional sections without writing code.
- Conditional Display module: Show or hide sections based on user type (guest vs logged‑in), device, date range, or other conditions (great for time‑limited offers).
- Advanced Sticky module: Keep the Add to Cart box or key CTA visible as users scroll through the details.
Use these enhancements carefully. Aim for a page that feels focused and fast; don’t overload it with animations or competing CTAs.
Step 7: Set display conditions and publish your template
When you’re satisfied with your Single Product layout:
- Click Publish in the Elementor editor.
- In the Display Conditions dialog, set the condition to Include → Products → All Products so your template applies to every product page.
- Save the condition, then preview several products on the front‑end to confirm that titles, images, prices, and add‑to‑cart controls are all rendering correctly.
Later, you can create additional Single Product templates and use conditions like “Include → Products In Category → X” to tailor layouts for specific product lines (for example, a more visual layout for fashion, a spec‑heavy layout for electronics).
Example workflow: A simple product page for a handmade brand
Imagine you sell handmade candles.
- In the hero section, your left column uses a strong product image and, if you have Pro, a 360 Rotation widget so customers can see the candle from all sides.
- On the right, you show the product title, a short list of 3 key benefits (scent, burn time, ingredients), then the WC: Add To Cart widget with price and quantity.
- Below that, you add a Copy Coupon Code widget offering “WELCOME10” for first‑time customers, which shoppers can copy with one click and use at checkout.
- In the next section, Tabs handle “Description”, “Ingredients”, and “Care Instructions” to keep the page compact.
- At the bottom, a WC: Categories section highlights “Soy Candles”, “Gift Sets”, and “Seasonal Collection” so users keep browsing.
This entire setup runs from a single template, but it feels tailored and complete for each product.
Free vs Pro: When should you upgrade for product pages?
HT Mega’s free version already gives you a lot to build with:
- Over 100 free widgets and elements, including WC: Add To Cart, WC: Categories, WC: Pages, and many general layout widgets.
- Modules such as Theme Builder, Mega Menu, Sales Notification, Wrapper Link, Reading Progress Bar, Scroll To Top, Floating Effects, and Post Duplicator.
HT Mega Pro adds:
- Dozens of additional widgets: 360 Rotation, Filterable Gallery, Copy Coupon Code, Video Gallery, Charts, Flip Switcher Pricing, Facebook Review, WhatsApp Chat, and more.
- Advanced modules: Parallax, Particles, Conditional Display, Advanced Sticky, Custom CSS, Cross‑Domain Copy Paste.
- A significantly larger library of templates and blocks, which speeds up production across multiple projects.
If you just want a clean, branded product layout, the free version is usually enough to start. If you’re aiming for interactive visuals, personalized offers, and time‑saving workflows (especially across multiple sites), upgrading to Pro becomes more compelling, especially with the current discounted plans on the HT Mega pricing page.
SEO and UX Tips for Your New Product Template
To make your WooCommerce product page with Elementor perform better in both search and conversions:
- Use descriptive product titles and headings that naturally include your primary keyword and key attributes, but avoid keyword stuffing.
- Add descriptive alt text to images so search engines and assistive technologies understand your product content.
- Use HT Mega’s search and category widgets to improve on‑site navigation; users who search on‑site often convert at higher rates.
- Test your layout on mobile devices. Mobile shoppers are more likely to abandon carts, so clear CTAs and streamlined content matter a lot.
- Use social proof: combine WooCommerce product reviews with HT Mega’s testimonial or Facebook Review widgets for additional trust.
Frequently Asked Questions
Do I need Elementor Pro to build a WooCommerce product page with HT Mega?
You can use HT Mega with the free version of Elementor and still build a custom product layout by relying on HT Mega’s widgets and modules. However, Elementor Pro’s Theme Builder offers additional product‑specific widgets and deeper integration with WooCommerce, so combining Elementor Pro with HT Mega gives you the most flexibility.
Which HT Mega widgets are most important for a basic product page?
For a solid baseline layout, focus on: WC: Add To Cart, WC: Categories, Post Title, Post Featured Image, Post Content/Post Excerpt, and navigation or breadcrumb elements if you use Pro. These cover the core product information, images, buying action, and catalog context most shoppers expect.
How does HT Mega Pro improve WooCommerce product pages?
HT Mega Pro unlocks advanced widgets like 360 Rotation, Copy Coupon Code, Filterable Gallery, Video Gallery, Facebook Review, WhatsApp Chat, and more, along with modules like Parallax, Particles, Conditional Display, Advanced Sticky, and Custom CSS. These features help you create more engaging product experiences and can support higher conversion rates when used thoughtfully.
Will this setup slow down my WooCommerce store?
HT Mega uses a modular system where you can enable only the elements you need, which helps keep performance under control. For best results, combine this with good hosting, image optimization, and caching so your custom product pages remain fast on both desktop and mobile.
Can I use different product page layouts for different categories?
Yes. In Elementor’s Theme Builder, you can create multiple Single Product templates and use conditional rules like “Include → Products in Category → X” to control where each template applies. HT Mega’s dynamic widgets will pull the correct product data regardless of which template is active for that category.
Is HT Mega actively maintained and compatible with recent WordPress versions?
Yes. The HT Mega plugin listing on WordPress.org shows regular updates, compatibility with current WordPress and Elementor versions, and an actively maintained codebase. That helps ensure your product templates remain stable as your site and the underlying platforms evolve.
Final Words
A well‑designed WooCommerce product page does more than display a title, image, and price. It guides visitors from curiosity to confidence and then to checkout. By combining Elementor’s visual builder with HT Mega’s WooCommerce and Pro widgets, you can create a reusable product template that looks professional, answers real buyer questions, and supports higher conversions without touching code.
If you’re just starting, use HT Mega’s free widgets to build a clean, simple layout and get it live. When you’re ready to test more advanced visuals, discount strategies, and personalized content, upgrading to Pro gives you tools like 360 Rotation, Copy Coupon Code, Parallax, and Conditional Display to keep optimizing your store over time.