
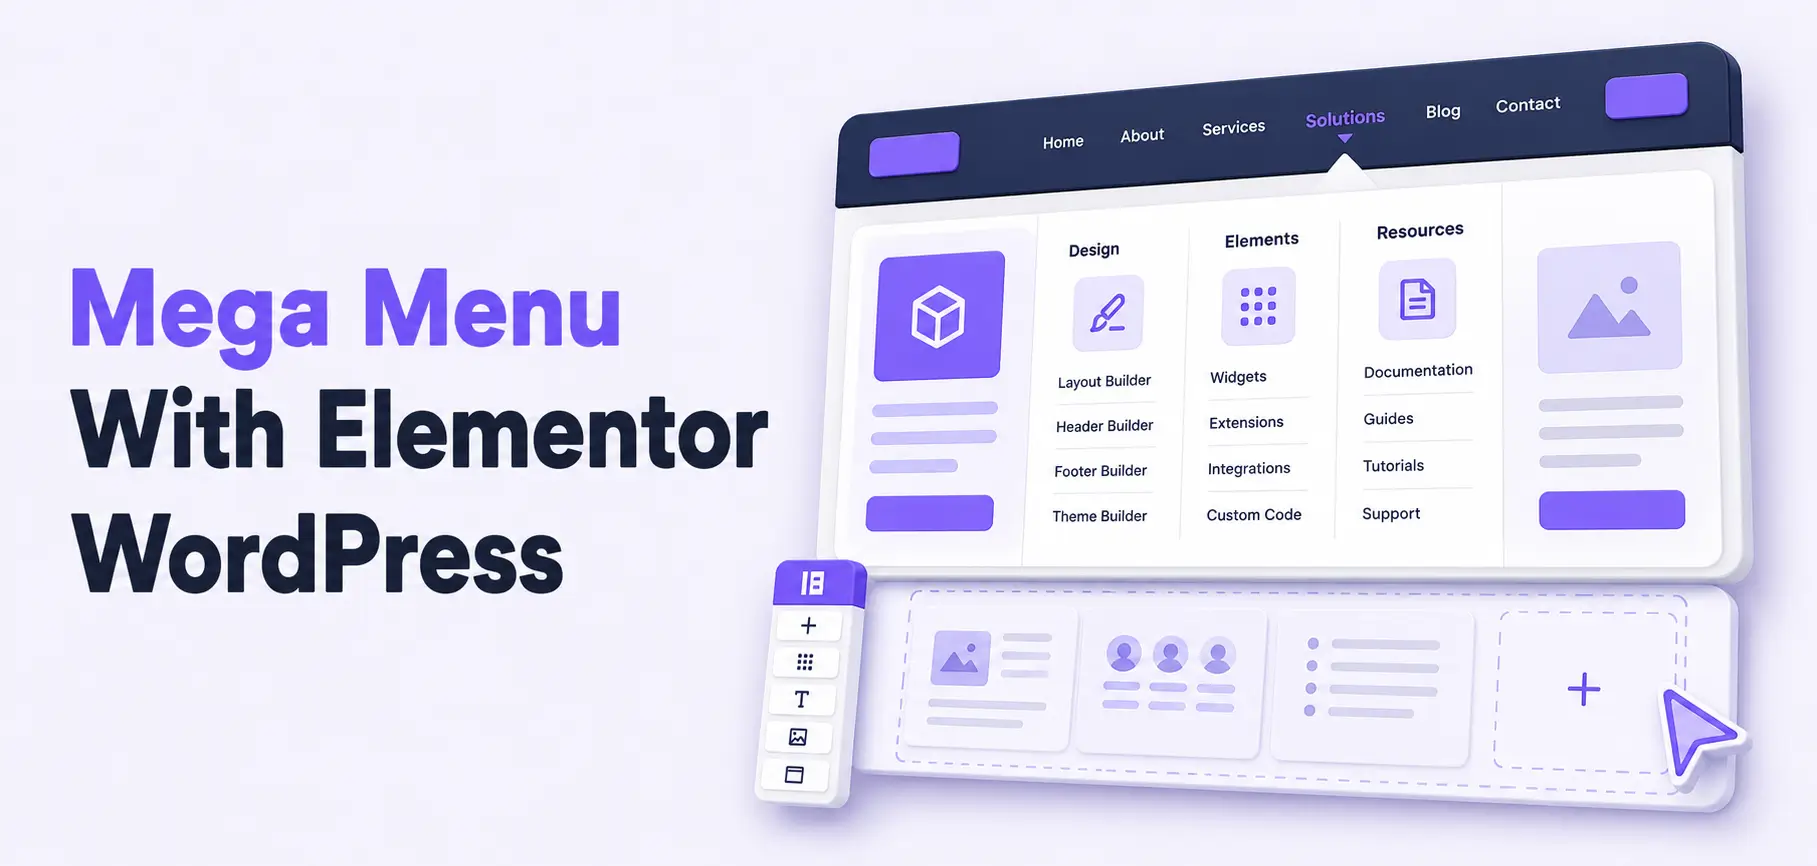

If you’ve been wondering how to create a mega menu with Elementor in WordPress, you’re in the right place.
A mega menu lets you build rich, multi-column dropdown menus with images, icons, links, and even WooCommerce widgets, all without touching a single line of code. And the best part? You don’t need Elementor Pro to do it.
In this guide, you’ll learn exactly how to build one using the free HT Mega plugin, which includes a built-in Mega Menu Builder module at no cost.
Quick Answer: Install HT Mega (free), enable the Mega Menu Builder module, create your WordPress navigation menu, then design each dropdown panel using Elementor’s drag-and-drop editor. Takes about 20 minutes.
Table of Contents
What Is a Mega Menu?
A mega menu is a large, expandable dropdown navigation panel that displays multiple columns, categories, images, icons, or content blocks — all visible at once when a user hovers or clicks a top-level menu item.
Unlike a standard dropdown that shows a single vertical list of links, a mega menu gives you full design control over what appears inside each dropdown. You can add product categories, featured images, calls-to-action, search bars, or any Elementor widget you want.
Mega menus are especially useful for:
- eCommerce stores with many product categories
- Multi-service businesses with complex service offerings
- Content-heavy sites like magazines or knowledge bases
- WooCommerce stores showcasing categories, promotions, and featured products
According to Nielsen Norman Group, mega menus reduce navigation time by 37% compared to standard dropdowns on websites with more than 50 pages.
Why Use Elementor to Build a Mega Menu?
Elementor is the most widely used page builder for WordPress. As of 2026, it powers around 13% of all websites globally, which translates to roughly 18.6% of all CMS-based websites. That reach means it’s well-supported, regularly updated, and compatible with virtually every theme.
Building your mega menu inside Elementor means your menu visually matches your site design, you don’t need to learn a separate interface, and you get full control over layout, colors, typography, and responsiveness.
What You Need Before You Start
Before diving into the steps, make sure you have the following in place:
- WordPress installed and running
- Elementor (free version is enough) installed and activated
- HT Mega for Elementor plugin installed; the Mega Menu Builder is included free
- A basic WordPress navigation menu already created (or you’ll create one during this guide)
No coding skills required. HT Mega’s Mega Menu Builder is 100% drag-and-drop.
How to Install and Activate HT Mega
Step 1: Install HT Mega
- Go to your WordPress Dashboard
- Navigate to Plugins > Add New
- Search for “HT Mega”
- Click Install Now, then Activate
You can also download the plugin directly from WordPress.org.
The free version gives you access to 84+ Elementor widgets, 8 free modules (including Mega Menu Builder), and a template library – all at no cost.
Step 2: Enable the Menu Builder Module
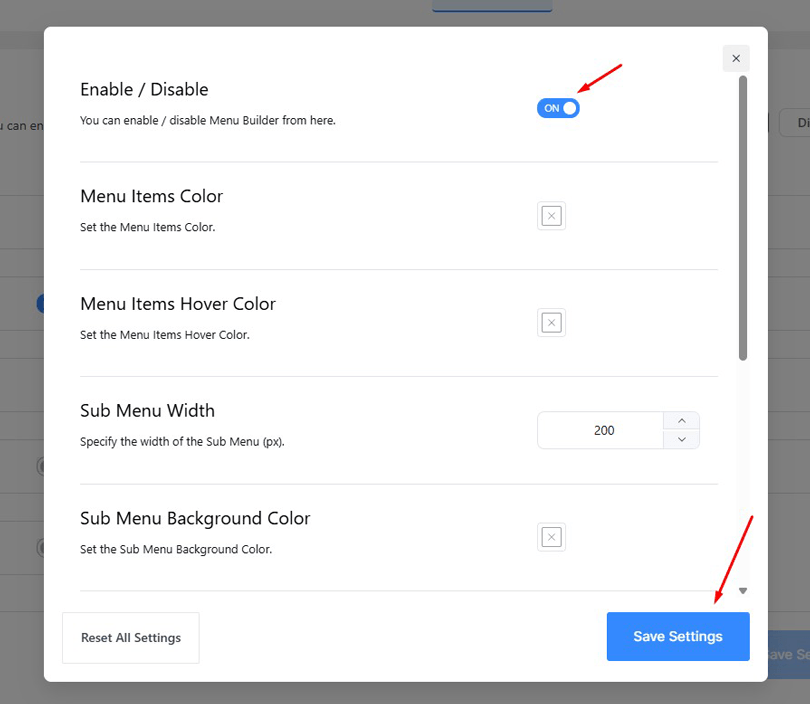
Once HT Mega is active:
- Go to HT Mega > Settings in your dashboard sidebar.
- Click on the Modules tab.
- Find Mega Menu Builder and toggle it ON.
- Click Save Settings.
This activates the mega menu functionality and adds the mega menu controls to your WordPress navigation menu editor.
Step-by-Step: Create a Mega Menu with Elementor
Step 3: Create or Edit Your WordPress Navigation Menu
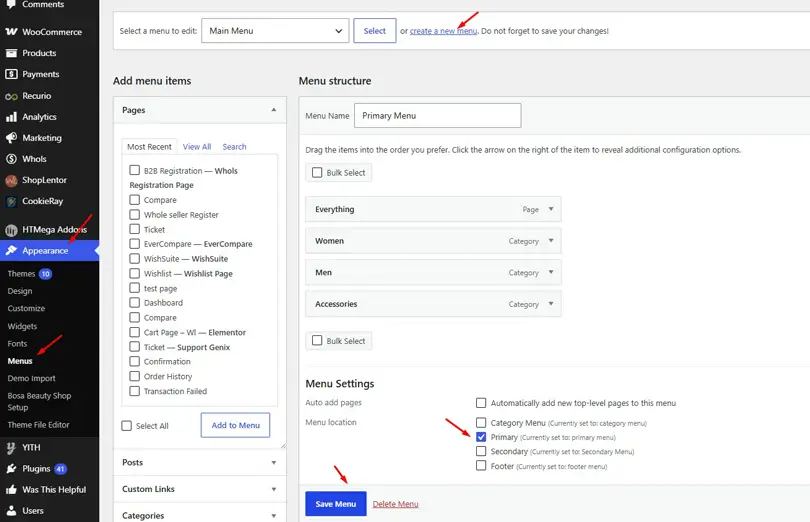
- Go to Appearance > Menus in your WordPress dashboard
- Either select an existing menu or click Create a new menu
- Name your menu (e.g., “Main Menu”) and click Create Menu
- Add your top-level pages or custom links — these will become the parent items in your mega menu
- Set the Display Location to “Primary Menu” (or whichever location your theme uses)
- Click Save Menu
Your top-level items (e.g., Shop, Services, Blog) will each have the option to show a mega menu dropdown.
Step 4: Enable Mega Menu for a Menu Item
Now you’ll tell WordPress which menu items should have a mega menu dropdown:
- In Appearance > Menus, hover over any top-level menu item
- You’ll see a Mega Menu Settings icon (gear icon) next to the item — this appears after HT Mega is activated
- Click on it to open the mega menu settings panel for that item
- Toggle Enable Mega Menu to ON
- You’ll see options for:
- Width (full-width or custom px)
- Position (left, center, right)
- Trigger (hover or click)
- Badge text (e.g., “New”, “Hot”), useful for drawing attention to specific items
- Click Save to apply
Repeat this for any top-level items you want to include in the mega menu.
Step 5: Design the Mega Menu Content in Elementor
This is where the real power comes in. Each mega menu item can have a completely custom Elementor-designed dropdown panel.
- With the mega menu settings open for a menu item, click Edit Mega Menu Content
- This launches the Elementor editor in a dedicated canvas for that dropdown
- You now have a blank layout — start building it exactly like you would any Elementor section:
- Add columns (2-column, 3-column, or 4-column layouts work best)
- Drag and drop widgets from the HT Mega panel: Heading, Image, Button, Post Grid, Search, etc.
- Use Inline Menu widget to add sub-links within each column
- Add promotional banners using the Image or Call-to-Action widget
- Include icons using the Icon Box or Tooltip widget
- In the Style tab, customize colors, fonts, backgrounds, hover effects, borders, and spacing
- Click Publish or Update when done
You can design each dropdown independently; for example, your “Shop” menu item can show product categories and a featured image, while “Services” might use a text-and-icon grid layout.
Step 6: Add Your Header with the Mega Menu to Your Site
Your mega menu needs to be part of a header that’s displayed on your live site. If your theme already has a header, your WordPress menu assignment (from Step 3) handles this.
If you want more design control, you can use HT Mega’s Theme Builder (also free) to build a custom header:
- Go to HT Mega > Theme Builder
- Click Add New and select Header as the template type
- Click Edit with Elementor
- Add your logo, navigation widget, and other header elements
- Use the Nav Menu widget and assign your mega menu to it
- Publish the header and set its display conditions (e.g., “Entire Site”)
This approach gives you a completely custom header that matches your brand — and it’s part of HT Mega’s free module set.
Step 7: Preview and Test Your Mega Menu
Before publishing, always test:
- Desktop view — hover over each parent item to verify dropdowns appear correctly
- Tablet view — check that columns stack properly on medium screens
- Mobile view — verify that the mega menu collapses into a touch-friendly mobile menu
- All browsers — test in Chrome, Firefox, Safari, and Edge
Use Elementor’s Responsive Mode controls to preview and adjust layouts for different screen sizes directly inside the editor.
Video Presentations
HT Menu – WordPress Mega Menu Builder for Elementor: Elementor mega menu tutorial
Practical Example: WooCommerce Store Mega Menu

Here’s how a typical WooCommerce store might set up a mega menu for its “Shop” navigation item:
Column 1 — Categories
- Use the Inline Menu widget to list product categories: Women, Men, Kids, Accessories
- Link each item directly to the WooCommerce category archive page
Column 2 — Featured Section
- Add a Heading (“New Arrivals”)
- Below it, insert a Post Grid widget filtered to show the latest 3 WooCommerce products
Column 3 — Promo Banner
- Use an Image widget or Call-to-Action widget
- Display a seasonal sale banner (e.g., “Summer Sale — Up to 40% Off”) with a Shop Now button
Column 4 — Quick Links
- Add links to: Sale Items, Best Sellers, Gift Cards, Track Order
This setup gives shoppers a clear, visual overview of your store structure the moment they hover over “Shop” — reducing bounce rate and increasing the likelihood they find what they need.
HT Mega Mega Menu Builder: Free vs. Pro
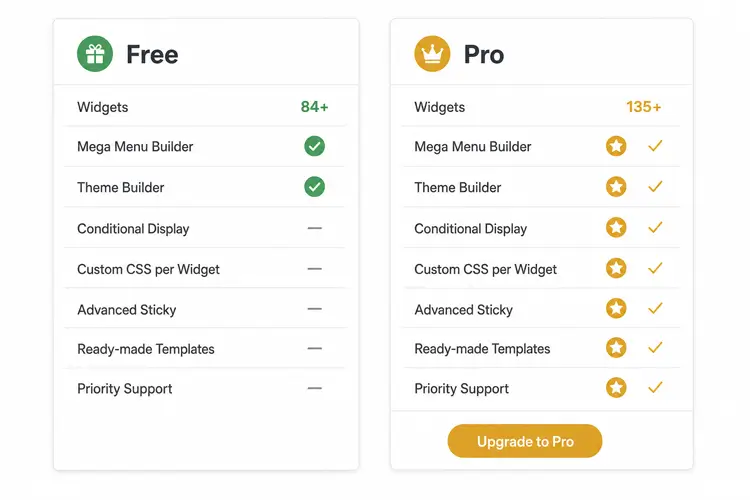
The Mega Menu Builder is a free module in HT Mega — you get it without paying anything.
The free version of HT Mega includes:
- Mega Menu Builder module (fully functional)
- 84+ Elementor widgets
- Theme Builder (header, footer, archive, single post)
- 8 powerful modules total
- AI Writer (OpenAI, Claude, Gemini)
If you need more advanced design capabilities for your mega menu content panels, upgrading to HT Mega Pro unlocks:
- 135+ total widgets (51+ additional Pro-exclusive widgets)
- Advanced Slider, Lottie Animation, Filterable Gallery for visually richer menu panels
- Conditional Display — show/hide menu content based on user login status, device type, or other rules
- Custom CSS per widget for pixel-perfect styling
- 795+ ready-made blocks and 245+ page templates to pull into your mega menu panels
HT Mega Pro Pricing
| Plan | Sites | Yearly | One-Time |
| Personal | 1 site | $49/yr | $99 |
| Developer | 5 sites | $79/yr | $149 |
| Growth | 999 sites | $99/yr | $199 |
All Pro plans include 135+ widgets, 14+ modules, AI Writer, 795+ blocks, and 245+ templates.
Start free Download HT Mega on WordPress.org and build your mega menu today. Upgrade to Pro only when you need the advanced features.
Tips for a High-Performing Mega Menu
Follow these best practices to make sure your mega menu improves both UX and SEO:
Navigation structure
- Keep your top-level items to 5–7 max – don’t overwhelm visitors
- Use clear, descriptive labels that match your audience’s language
- Group related items into labeled columns so scanability is high
Design
- Use icons to make categories scannable at a glance
- Add badges (“New”, “Hot”, “Sale”) to direct attention to priority areas
- Keep background colors consistent with your site’s brand palette
Performance
- Enable only the HT Mega widgets you actually use – the modular loading system ensures unused widgets don’t slow down your site
- Avoid loading heavy image files inside the mega menu dropdown
- Test Core Web Vitals after adding your mega menu (use Google PageSpeed Insights)
Mobile experience
- Always preview on mobile and tablet inside Elementor’s responsive editor
- Ensure tap targets are large enough (minimum 44×44px)
- Test that the mobile hamburger menu works correctly with your header setup
SEO
- Include internal links to your most important category and landing pages inside the mega menu
- Use descriptive anchor text – this helps both users and search engines understand your site structure
- Avoid JavaScript-only menus that search engines can’t crawl
Frequently Asked Questions
Q1: Can I create a mega menu with Elementor for free?
Yes. You don’t need Elementor Pro to build a mega menu. The free HT Mega plugin includes a Mega Menu Builder module that works with the free version of Elementor. Install HT Mega, enable the module, and you can design full dropdown panels using Elementor’s drag-and-drop editor, no premium subscription required.
Q2: Does HT Mega’s Mega Menu Builder work with any WordPress theme?
Yes. HT Mega is compatible with any WordPress theme. You can assign your mega menu to whatever navigation location your theme provides. If you want full control over your header design, you can use HT Mega’s free Theme Builder to create a custom header that includes your mega menu.
Q3: What’s the difference between a mega menu and a standard dropdown menu?
A standard dropdown menu shows a simple vertical list of links when a user hovers over a parent item. A mega menu shows a large, full-width (or custom-width) panel with multiple columns, images, icons, widgets, and grouped links, all visible at once. Mega menus are better suited to sites with many pages, product categories, or complex navigation needs.
Q4: Is a mega menu good for SEO?
Yes, when built correctly. A well-structured mega menu improves internal linking across your site, helps search engines discover deeper pages faster, and reduces bounce rate by helping users find relevant content more easily. Use descriptive anchor text for links inside your mega menu, and make sure the HTML is crawlable (avoid pure JavaScript rendering).
Q5: Can I add WooCommerce elements inside my Elementor mega menu?
Yes. With HT Mega, you can add any Elementor widget inside your mega menu dropdown panels, including WooCommerce-compatible widgets like Post Grid (filtered to products), Call-to-Action banners, Add to Cart buttons, and more. This makes HT Mega’s mega menu particularly useful for WooCommerce stores that want to showcase categories and promotions directly in the navigation.
Q6: How do I make my Elementor mega menu mobile-friendly?
After designing your mega menu in Elementor, switch to Responsive Mode in the editor (bottom toolbar). Preview your layout on tablet and mobile breakpoints. Adjust column stacking, font sizes, and spacing for smaller screens. HT Mega’s mega menu automatically collapses into a touch-friendly mobile navigation format. Always test on a real device as a final check before publishing.
Q7: What are the prerequisites for using HT Mega’s Mega Menu Builder?
You need WordPress, the free Elementor plugin, and the free HT Mega plugin. Elementor Pro is not required. PHP 7.4 or higher and MySQL 5.6 or higher are the recommended server requirements. The plugin is regularly updated, as of May 2026, the latest release is v3.1.0.
Conclusion
Building a mega menu with Elementor in WordPress doesn’t require coding skills, expensive plugins, or Elementor Pro. With the free HT Mega Mega Menu Builder module, you get a full-featured, visually editable mega menu that works with any theme and any Elementor setup.
The process boils down to four things: install HT Mega, enable the module, design your dropdowns in Elementor, and add it to a header. Start simple, then layer in more design detail as your site grows.
→ Download HT Mega for free and build your first mega menu today.
Want to go further? Explore the full range of HT Mega Elementor Widgets to add post grids, search bars, carousels, and more inside your mega menu panels.